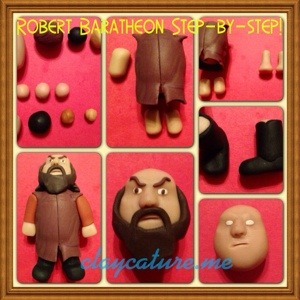
This is a bit backwards, maybe I’ll start posting these first before the finished products! These are the photos I took while I was making Little Robert Baratheon in polymer clay. The best I like about polymer clay is that is very forgiving–you can change it whenever you want until you bake it! Also, you can mix colors to match whatever you want, which is what I always do before starting a project!
First you have to draw a caricature of what you are going to make. There are many details in the “original” that you will probably don’t want, so make sure you know exactly what you are going build before you build it. to Once you have decided with colors and what size your sculpture is going to be, lay out the clay accordingly.Once you get the right size for the body, head and legs. Let’s start with the biggest, the body. I covered it with brown clay. You might ask, “why not just make it a brown ball”? well, its simple, because colored clay is more expensive than normal tan clay =)Make the coat simple, you can add detail later. I over extended the bottom and made a cut in the middle so it looks like a cloth. Place it next to the arms and legs to ensure that you have the proper proportions.Now let’s jump to the arms. Remember that his arms are covered in brown clay, so you are going to thin out the top portion and the bottom portion will be the hands.This is a close look to his hands. Make them squares, it will be a lot easier to make the hands later.I skipped making the sleeves. All you need to do is lay some clay flat and wrap it around the arms. Then just put it on the body to ensure that you don’t need to cut it or adjust it.Do the same you did for his arms. This time you will do it for his legs. Wrap them in black, then add the front of the feet with a little piece of clay. Shape it like legs and feet. Remember, don’t add too much detail, because you will manipulate these pieces some more. Manipulating it more will mean that your detail will get “erased.”Once you have the legs ready, go ahead and place them on the body to ensure proportions are still the way you want them.Now that we are done with the main part of the body. Let’s do the face! look at the picture and draw it into a caricature. I notice this guy was big at the bottom and had a mean look, so I made sure that this was noticeable.There are a lot of ways to do eyes. The easiest way for me is this one. Just add little pieces of white clay. Make sure that you don’t loose the “look” of the person. Some people are harden than others, but you get the point.Add the facial hair, eyes, and eyebrows. It is very important that the eyebrows look like the one in your picture. They will really define it’s features. Now, I did not do too much detail on his beard, which you could do if you wanted. I wanted to make this easy for anyone to remake.Add his hair and place it on the body, check proportions. Sometimes the hair will come out too “thick” and you will have to push in the hair or thin it out in order to keep the right proportions.This is one of my favorite parts. Add as much detail as you like. be careful not to mess up by pushing it too hard.This is the last, just add his crown by laying out a piece of clay and cutting it. Add detail before you put it on. I added his belt, buttons and shoulders. This is the part where you can add as much detail as you like. Then you should be good to go! before you bake it, I recommend waiting a day, because you might want to add some more detail or even paint some. I hope you liked it! Thanks for visiting!
My spouse and I stumbled over here coming from a different website and thought I may as well check things
out. I like what I see so now i’m following you. Look forward to exploring your web page for a second time.


Great job. I like the progress.
Thanks!
My spouse and I stumbled over here coming from a different website and thought I may as well check things
out. I like what I see so now i’m following you. Look forward to exploring your web page for a second time.
Thanks!